Once you have configured Idealpos and Ideal Kitchen Monitor, you will able to start sending orders to the IKM Kitchen Displays (and if configured/enabled, ready orders will be displayed on IKM Customer Display screens).
It is important to run a few orders as tests to ensure that the display and everything you want is working correctly.
This is a system that allows for changes to be made on the fly, but try and get all the settings correct before the system goes live.
The bottom of the Ideal Kitchen Monitor application displays the following buttons (these buttons are outlined in further detail within the Buttons page of the Ideal Kitchen Monitor topic):
To quickly jump to any section in this topic, click on one of the following links:
Sending orders to the IKM Kitchen Display - Details on how to send orders from the POS screen to the IKM Kitchen Display.
Sending orders to the IKM Customer Display - Details on how to send orders from the IKM Kitchen Display to the IKM Customer Display.
Strike-through single Items - Details on how to use the Strike-through function to mark items off as they're sent/completed. This may be useful in degustation style services.
Deleting Items from Tables - If your system is using the Ideal Kitchen Monitor module together with the Restaurant Table Map module, this section outlines the configuration of IKM to control the way items deleted from tables are displayed.
Rush/Expedite Order function - Details on how to enable and use the Rush Order/Expedite Order function which will display the sent order ahead of the other orders which have already been sent. This functionality requires Idealpos v8 Build 1 or higher and Ideal Kitchen Monitor 3.0.0.1 or higher.
In Idealpos, add items to a sale.
Note!
If IKM is connected to an IKM Customer Display, each ready order that you want to send to the IKM Customer Display must have an order number.
The order number must be entered during the sale and cannot be assigned to the sale once it has been sent to the IKM.
There are a number of ways an order number is assigned to a sale:
- Saving a sale to a table will assign the table number to the sale.
- Saving a sale to a Bar Tab will assign the Bar Tab number to the sale.
- Saving the sale as a Pending Sale; the Pending Sale code will be assigned to the order.
- Adding an order number to a normal sale by pressing an order number button or having Idealpos configured to automatically assign an order number for each sale.
- Web Orders received from eCommerce will use the Web Order number.
If an order number is not entered during the sale, the ready button will be greyed out and it won't be possible to send it to the IKM Customer Display when it is ready for collection by the customer.
If an order number isn't used, it is still possible to mark an order as done to have it cleared from the IKM Kitchen Display.
Note that if you have pagers configured in your system, the Ready or Done button can be configured to send to a pager.
Once the required items have been added to the sale, save the sale using one of the following methods:
The below example shows the sale being assigned an order number 4 (as indicated by the "O# 4" shown at the top of the POS screen).
Once the order is saved or the sale is processed, the order will appear instantly on the IKM Kitchen Display.
Use the Touchscreen or Bump Bars to proceed with the service of the order.
If you have an IKM Customer Display configured and want to display the ready order on the Customer Display, select the order and press the "Ready" button.
Marking an order as "Done" without pressing the "Ready" button will result in the order being cleared from the IKM Kitchen Display and it won't be sent to the IKM Customer Display.
A check icon will appear within the order that has been marked as ready as shown below:
The order will be displayed on the IKM Customer Display similar to the below example:
If you accidentally mark an order as ready, select the order on the IKM Kitchen Display and press the "Ready" button again.
The check icon will be cleared from the IKM display and the order will also be cleared from the IKM Customer Display.
Once the customer has collected their order, select the order on the IKM Kitchen Display and press the "Done" button.
This will clear the order from both the IKM Kitchen Display and the IKM Customer Display.
You are able to strike out single items as they are sent within the order.
This might be useful in degustation style services.
To access this feature, select the table from the IKM screen, press the “Zoom” button.
Then click into the box next to the Stock Item that you want to mark as done.
A strike-through will be placed through the Stock Item on the IKM screen.
You can also click the checkbox again to uncheck the item and the strike-through will be removed from the Stock Item on the IKM screen.
If your system is configured with Table Maps and Ideal Kitchen Monitor, and you've saved an order to a Table, Items can be deleted from the Table.
This will result in a negative item being sent to the IKM to display the deleted item.
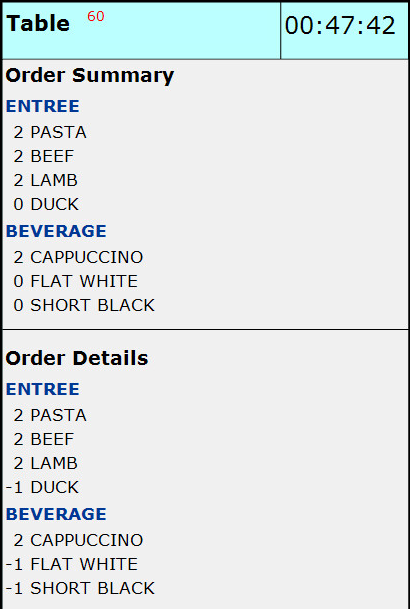
Deleted Items can be displayed as either a 0, -1, or both.
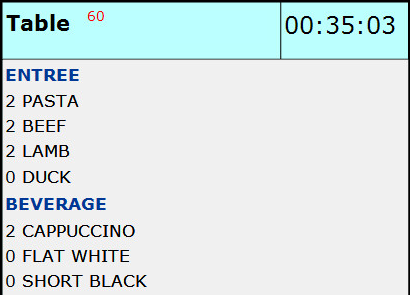
When configured using the settings shown under the heading "0 appears when the order Format is set as", 0 will be displayed when a single quantity of an item was originally ordered, then removed from a table.
If only a portion of the originally ordered quantity is deleted from the table, the deleted item won't appear as 0, but will rather just have the quantity updated to reflect the current quantity ordered.
E.g. Order 3x Cappuccino then delete 1x Cappuccino, the quantity will be updated to show 2 Cappuccino rather than 0 Cappuccino.
Obviously, if 3x Cappuccinos are ordered then 3x Cappuccinos are deleted from the table, the IKM Kitchen Display will then show 0 Cappuccino.
This logic will apply when your system is configured using the settings shown under the "0 appears when Order Format is set as" heading further below.
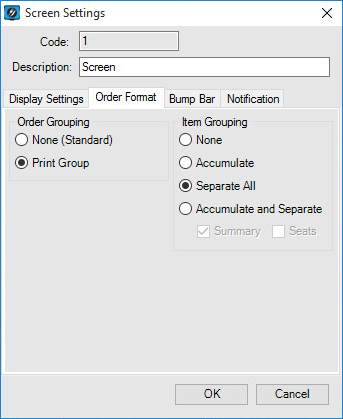
When configured using the settings shown under the heading "-1 appears when the Order Format is set as", -1 will be displayed when an item is ordered then removed from a table.
For this particular setup, -1 will be displayed next to deleted items regardless of whether a single item was originally added to a table or multiples of the same item were originally added to the table.
The Order Format settings of the IKM will control how deleted items will be displayed.
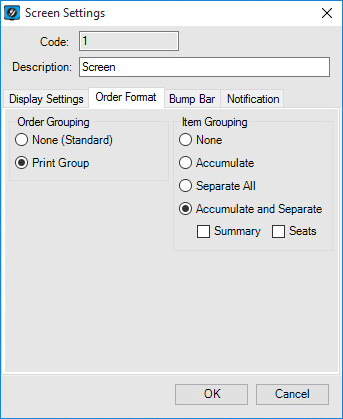
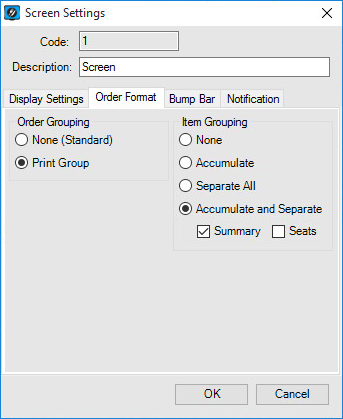
To adjust the Order Format, go to: Ideal Kitchen Monitor (Server) > Setup > Screens > Select Screen > Modify > Order Format tab
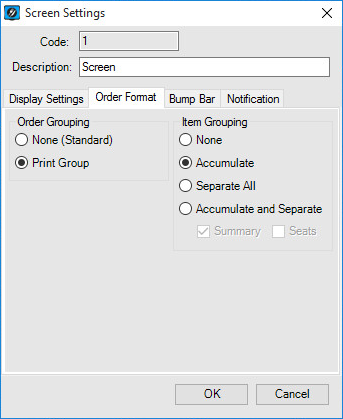
The below IKM Order Format Settings indicate whether deleted items will appear as "-1" or "0" on the IKM Kitchen Display:
-1 appears when the Order Format is set as:
0 appears when the Order Format is set as:
Both -1 and 0 appear when the Order Format is set as:
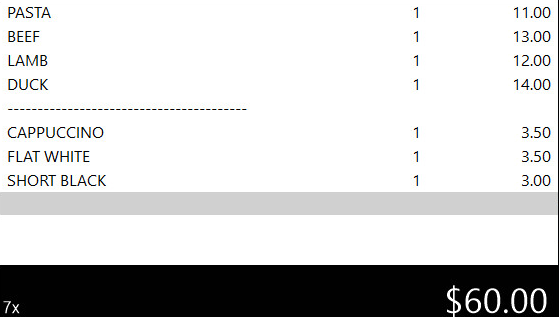
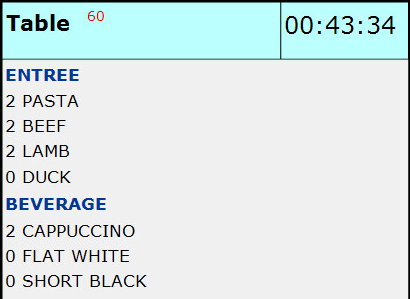
In the IKM Kitchen Display examples shown below, the following items were saved to Table 60 via the Table Map:
2x Cappuccino
1x Flat White
1x Short Black
---------------------
2x Pasta
2x Beef
2x Lamb
1x Duck
Once the items were saved to Table 60, the following items were then deleted from Table 60:
1x Flat White
1x Short Black
1x Duck
Deleted Items Display as -1
Deleted items will display as -1, which counters the positive 1 of the same items within the order.
The following combinations/examples trigger deleted items to appear as "-1":
Deleted Items Display as 0
Deleted items will display as 0 in place of the positive 1 in the order.
The following combinations/examples trigger deleted items to appear as "0".
Note that not all deleted items will appear as 0.
This is dependent on the quantity originally ordered then deleted.
E.g. Ordering 3x Cappuccino then deleting 1x Cappuccino, the quantity will simply be displayed as 2 Cappuccino.
Whereas ordering 1x Cappuccino then deleting 1x Cappuccino, the quantity will be displayed as 0 Cappuccino.
Deleted Items display as -1 and 0
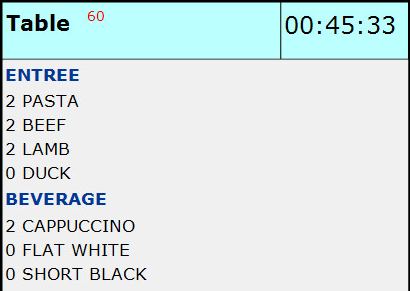
Deleted Items will appear as 0 under the Order Summary and will appear as -1 under the Order Details as shown in the below example:
This function requires Idealpos v8 Build 1 or later and Ideal Kitchen Monitor 3.0.0.1 or later.
To configure this function, create a new Stock Item with a description of either RUSH ORDER or EXPEDITE ORDER
To create the item, go to: File > Stock Control > Stock Items.
Press the "Add" button on the top-left corner of the Stock Items window.
Enter the Description "RUSH ORDER" or "EXPEDITE ORDER" into all the description fields (Description, Kitchen Description, Long Description/Description 3).
Note that you do not need to enable the IKM printer in the Printer Settings, however, doing so will not affect this function but rather will also trigger RUSH ORDER to appear as an item within the order sent to Ideal Kitchen Monitor.
Once complete, press the "Save" button on the top-left corner of the window to create the item.
In order to trigger this function, a button will also need to be created on the POS Screen.
Close the Stock Items windows, then go to:
Back Office > Setup > POS Screen > POS Screen Setup > Select POS Screen Layout > Buttons
Select a suitable POS Screen tab which contains a blank POS Screen button which you'd like to assign to the Rush Order/Expedite Order function.
The below example shows the Admin tab which has several unused blank buttons that can be assigned.
Select a button and link it to the Stock Item function.
In the Stock Item field, press the ">" button and search for the RUSH ORDER/EXPEDITE ORDER Stock Item that was created further above.
Ensure that you press "Save" to create the button on the POS Screen.
When an order needs to be expedited/rushed, add the required items to the order then navigate to the POS Screen tab where the RUSH ORDER or EXPEDITE ORDER button was created and press it.
When the order is finalised (either saved to a table or paid without saving to a table), it will be sent to the Ideal Kitchen Monitor and will be displayed ahead of the other orders that have already been placed as shown in the below example: